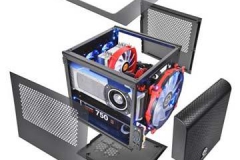
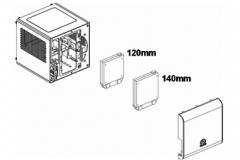
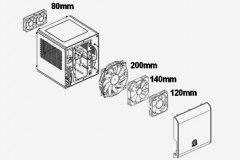
The official specifications of the Core V1 are listed below, followed by our observations of the case when building in it. The designers have made allowances in the frame for longer graphics cards and standard sized power suplies as well as push-pull fan configurations on either a 120mm or 140mm radiator.
| Model | Core V1 |
| Part Number | CA-1B8-00S1WN-00 |
| Case Type | Mini Case |
| Dimension (HxWxD) | 276 x 260 x 316 mm (10.9 x 10.2 x 12.4 inch) |
| Side Panel | Transparent Window (interchangeable) |
| Colour | Exterior & Interior : Black |
| Material | SPCC |
| Cooling System | Front (intake) : 200 x 200 x 30 mm fan (800rpm, 13dBA) |
| Drive Bays | -Hidden : 2 x 3.5” , 2 x 2.5” |
| Expansion slots | 2 |
| Motherboards | 6.7″ x 6.7″ (Mini ITX) |
| I/O Ports | USB 3.0 x 2, HD Audio x 1 |
| PSU | Standard PS2 PSU (optional) |
| Fan Support | Front: 1 x 120mm or 1 x 140mm or 1 x 200mm Rear: 2 x 80mm |
| Radiator Support | Front: 1 x 120mm or 1 x 140mm |
| Other | CPU cooler height limitation: 140mm VGA length limitation: 255mm (Inner chassis) 285mm (Outer chassis) PSU length limitation: 200mm |
Key Features
- Chambers Concept
- Advanced Ventilation
- Interchangeable side panels
- Handy IO Ports
- Great expansion in compact size
Images courtesy of Thermaltake
Thermaltake has managed to cover all of the essentials for a LAN or Steam Box case plus a few nifty extra features without breaking the bank and still making the case very modder friendly.
Cooling
CPU cooler height restrictions limit the total height of the cooler to 140mm – Not to be confused with a 140mm cooler. To be clear, the Noctua NH-U12S 120mm tower cooler is 158mm in height and will not fit. The AIO water coolers are starting to look like a good partner for the Core V1. That said, a 90mm tower fan should fit with room to spare and the low profile coolers are also going to be worth looking at with the Core V1 but for overclocking, I’d be installing a 120mm or 140mm AIO cooler for sure. The front fan mount is in a good location for a radiator as it draws fresh cool air through the heat exchanger. Although this means that the air going into the case will be warm under load, a pair of 80mm fans on 5v at the back of the case will help but the ventilation did seem very effective without additional fans fitted.
The front fan is rated at 13dBA, spins at 800rpm and unlike the fans on the Core V71, it doesn’t have any LEDs in it. The 200mm fan has a 3 pin connector for so it’s not PWM capable but could be controlled from on board software or via voltage reduction adapters as there isn’t much room to fit a fan controller in the Core V1. From 1 metre away, I was unable to pick out the front fan from the rest of the system noise.
There are 2 dust filters,
- one on the bottom of the case for the power supply vent that slides out for easy cleaning
- the front panel is one big dust filter for the 200mm fan. The whole panel comes off easily for cleaning
The dual 80mm fan mount at the back allows for a pair for fans (not included) like we saw at the front of the Fractal Design Node 304 – 80mm might be small but at low speed, they can move enough air to make a difference very quietly. 80mm fans are also not that expensive so a pair won’t break the bank and you don’t need to install them right away either – due to the accessibility of the case, it isn’t hard to fit them later on if temps are an issue. These really are optional and system temperatures were perfectly fine after hours of load testing with the one 200mm case fan. When 2x80mm fans were installed and run at 5v, the difference was marginal. If you are planning to run a hefty overclock it might be worth considering a pair of 80mm fans but otherwise I wouldn’t bother. The gallery below chows our test build both with and without a pair of Deep Cool 80mm case fans (model SF-801B)
Case Layout
The use of chambers is nothing new but it is well executed and there are a few ways to neatly route cables. The lower chamber allows a full size power supply so there is no need to be targeting a 140mm long unit although the smaller and more modular, the better for a mini ITX build. This means that you could run a power supply from a larger older build without needing to swap it out – recycling older parts leaves more room for important upgrades like graphics cards or SSDs.
The I/O ports are attached to the frame so that when you remove the front panel, you don’t have to worry about the cables. There are 2 USB 3.0 ports, a pair of microphone and headphone jacks, a power and reset button plus LEDs for power and HDD activity which is pretty standard. Also note that these are on the left side of the case
I really liked the big cut out for CPU cooler back plates. This is important given the amount on variation in the positioning of CPU sockets on mini ITX motherboards. It shows good vision by the designers as it would have been easy not to worry about cutting out an access hole there at all. There are is also a notable lack of traditional screw-in motherboard standoffs, the mounting is built into the frame of the Core V1. The only type of board going in this case is a mini ITX so it makes sense to just build the mounting points into the frame.
Zip tie anchor points are in abundance throughout the internal frame. There is also a plastic cap that sits over the rear PCIE slot plates to keep that looking neat – whilst it’s not earth shattering it does make the case look neat and is easier to work with than other covers I’ve seen in this position on alternative cases.
Graphics card accommodation
I was able to fit a Gigabyte GTX 670 OC with a Windforce 3 cooler into the Core V1. There was some manoeuvring required but essentially I just slid it straight in from the front of the case. Attaching the power cables was fine but other types of cards may be more interesting as the front panel cut out is close to where the power connectors on recent model graphics cards are located. The front cut out has plenty of room so there is no chance of the back of the card touching the case and shorting out.
Interchangeable panels
Interchangeable side and roof panels – one with a clear window, two with a perforated grill. The side panel closest to the graphics card is best serviced by a grill panel to feed the graphics card with fresh air, take your pick on the other two though. The window panel on top gives a nice view into the case but the grill panel on the top allows for heat to rise out of the case easily. Personally, I’d mount the window up top so the sides look uniform with the grills.
The only drawback of the side panels is that whilst the grills are great for ventilation, they also let noise out of the PC. For comparison, the Node 304 is a more closed in case and tends to muffle hard drive and fan noise – that said our test configuration was quiet enough and the loudest component was the 7200rpm hard drive.
One of the (almost) hidden gems with the Core V1 is the fact that you can remove the floor panel as well. Basically, the Core V1 can be easily stripped of all exterior panels which makes for a faster and easier build process with a high chance of a neat result. Access to internal components and cables for management is excellent – this is also handy when upgrading or tweaking after the main build.
The Core V1 has tall feet so it sits higher up off the desk or cabinet giving the power supply plenty of room to breathe through the included dust filter. This also makes it easy to get your fingers underneath it when moving it around which is good for LAN parties.
Build Quality
The build quality of the Core V1 review sample we received was good but not in a retail box so I can’t vouch for how the retail stock is packed. I will say that Thermaltake has always been great when it comes to retail packaging in my experience so if you are ordering one of these online, I wouldn’t be too worried about damage in transit. The quality of construction was above average and certainly better than the price suggests but not quite what I’d consider premium.
All the panels lined up without any gaps or uneven join lines – as it should be.


